
This question has been asked several times by various users: „Can we get an authentication mechanism for Perlite?“
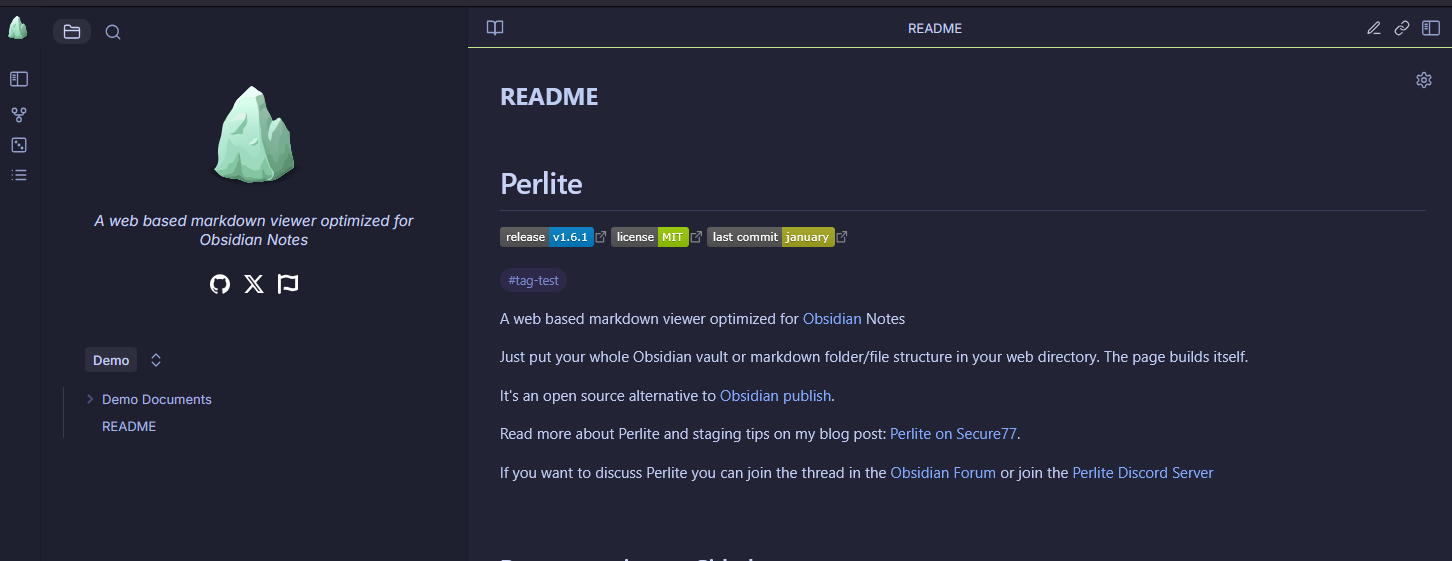
For those who don’t know what Perlite is: it’s a web app that lets you easily host your Markdown/Obsidian files on the internet yourself. For more information, see the Github repository. Perlite.
authentik is a self-hosted, open source identity provider hat offers you simple ways to manage users, applications, and access to these applications.
This Blog Post is about how to install and connect authentik with one (or more) instances of Perlite.

Requirements
- SSH access to a self hosted or cloud server
- DNS access to a domain
- Docker
Authentik Installation
This is strait forward, we just follow the official documentation for the docker compose setup.
After adding the secrets to the .env file, we add two more variables and change the listening ports to localhost only.
PG_PASS=<Replace>
AUTHENTIK_SECRET_KEY=<Replace>
COMPOSE_PORT_HTTP=127.0.0.1:9000
COMPOSE_PORT_HTTPS=127.0.0.1:9443
Nginx Setup
Deploy nginx either via a docker container or directly on the host. I will install it directly on the host. Other Webserver / reverse proxies are also working.
Next we are using Certbot via pip: https://certbot.eff.org/instructions?ws=nginx&os=pip for the certificate setup.
Certificates
We would like either a wildcard certificate to process the apps correctly, or we will apply for a certificate for each subdomain. We need at least a certificate for the authentication provider (authentik) and for the app.
- Create a wildcard DNS A record which points to the server
- Use Certbot with the manual DNS Plugin for the validation
certbot certonly \
  --manual \
  --preferred-challenges dns \
  -d "*.customer.company.de"
Certbot will prompt you to create a TXT record like: _acme-challenge.customer.company.de in your Domain DNS settings.
Config
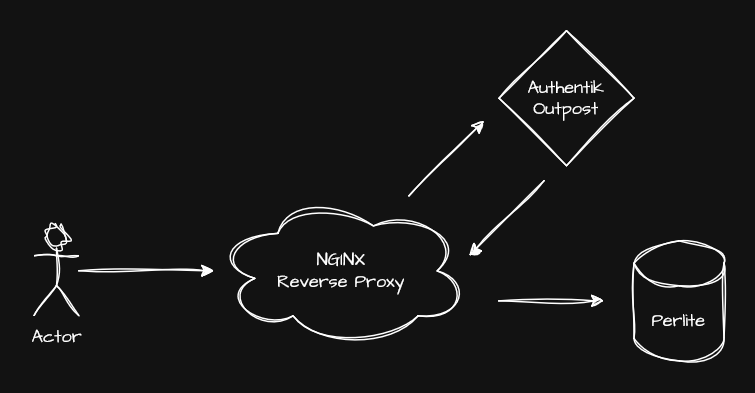
We use the following nginx configuration to make everything work. It is basically a simple reverse proxy that handles SSL offloading and forwards every request (to any subdomain) to the authentik backend. (http://127.0.0.1:9000)
# Authentik reverse proxy — *.customer.company.de
server {
    listen 443 ssl;
    server_name *.customer.company.de;

    # SSL
    ssl_certificate     /etc/letsencrypt/live/customer.company.de/fullchain.pem;
    ssl_certificate_key /etc/letsencrypt/live/customer.company.de/privkey.pem;

    # Modern SSL settings
    ssl_protocols       TLSv1.2 TLSv1.3;
    ssl_ciphers         HIGH:!aNULL:!MD5;
    ssl_prefer_server_ciphers on;
    ssl_session_cache   shared:SSL:10m;
    ssl_session_timeout 10m;

    # Recommended headers
    add_header Strict-Transport-Security "max-age=63072000; includeSubDomains; preload" always;
    add_header X-Content-Type-Options nosniff;
    add_header X-Frame-Options SAMEORIGIN;
    add_header X-XSS-Protection "1; mode=block";

    # Proxy to Authentik
    location / {
        proxy_pass          http://127.0.0.1:9000;  # Authentik HTTP port

        proxy_set_header    Host               $host;
        proxy_set_header    X-Real-IP          $remote_addr;
        proxy_set_header    X-Forwarded-For    $proxy_add_x_forwarded_for;
        proxy_set_header    X-Forwarded-Proto  $scheme;
        proxy_set_header    X-Forwarded-Host   $host;
        proxy_set_header    X-Forwarded-Port   $server_port;

        # WebSocket support (required for Authentik UI)
        proxy_http_version  1.1;
        proxy_set_header    Upgrade            $http_upgrade;
        proxy_set_header    Connection         "upgrade";

        proxy_buffering     off;
        proxy_read_timeout  600s;
    }
}

# Optional: redirect HTTP → HTTPS
server {
    listen 80;
    server_name *.customer.company.de;
    return 301 https://$host$request_uri;
}
Perlite Configuration
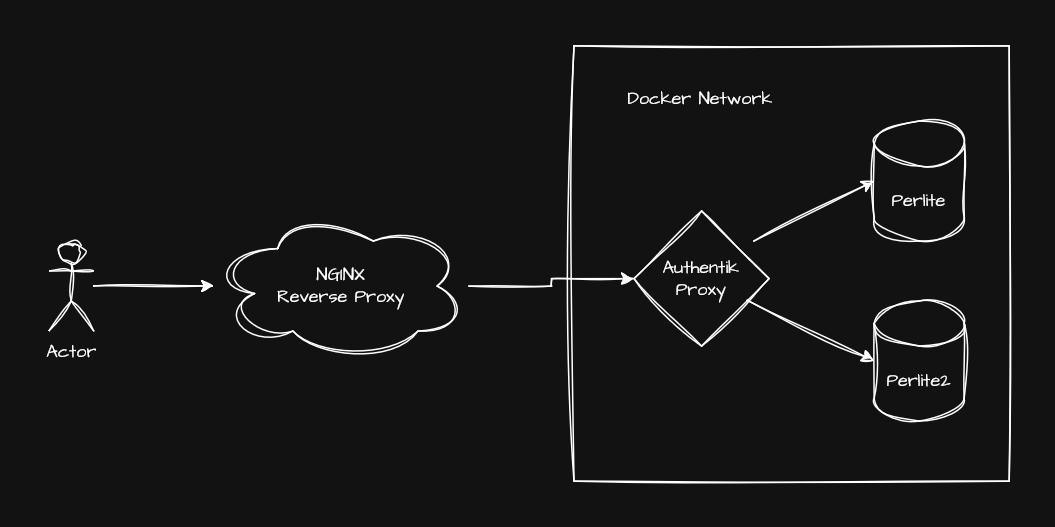
We will also use the Docker Compose version of Perlite. Since we will be using authentik’s built-in proxy provider, we need to make some adjustments to the Docker Compose file. The main difference is that we want our Perlite containers to be in the same Docker network as authentik and we don’t need a exposed port to the host.
We will add this to the perlite and web service:
    networks:
      - authentik_default
and at the end of the file the network itself
networks:
  authentik_default:
    external: true
The final docker compose file will look something like this (I have removed some environment variables to save space).
services:
  perlite:
    image: sec77/perlite:latest
    container_name: perlite
    restart: unless-stopped
    environment:
      - NOTES_PATH=Demo
      - HIDE_FOLDERS=docs,private,trash
      - LINE_BREAKS=true
      - ABSOLUTE_PATHS=false
    volumes:
      - ./Demo:/var/www/perlite/Demo:ro
    networks:
      - authentik_default

  perlite-web:
    image: nginx:stable
    container_name: perlite_web
    restart: unless-stopped
   #ports:
   #   - 80:80
    volumes:
      - ./web/config/perlite.conf:/etc/nginx/conf.d/default.conf:ro
    volumes_from:
      - perlite
    depends_on:
      - perlite
    networks:
      - authentik_default

networks:
  authentik_default:
    external: true
I also changed the service name web to perlite-web. This is not necessary, but since authentik accesses the container via this name, it is somewhat clearer if we have more than one app.
Authentik don’t like underscores for the internal host, so take care when you adjust the service name!
Authentik Configuration
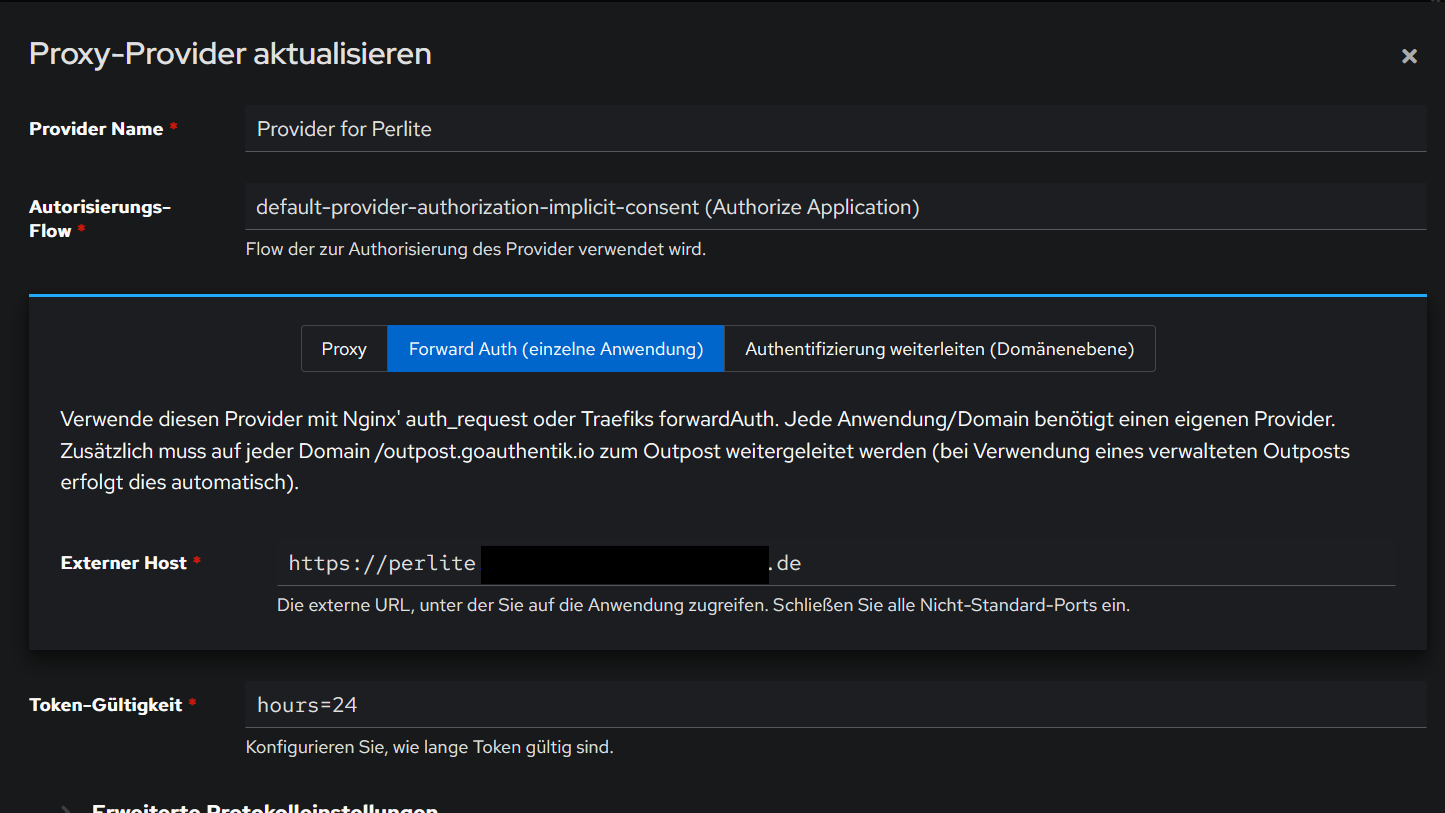
After you have set up an administrator account, we will create a new application with a provider. In the „Start URL“ field, you must enter your domain for the app. If you have set up a wildcard certificate and Nginx as described above, you can choose any subdomain name, e.g.: https://perlite.customer.company.de
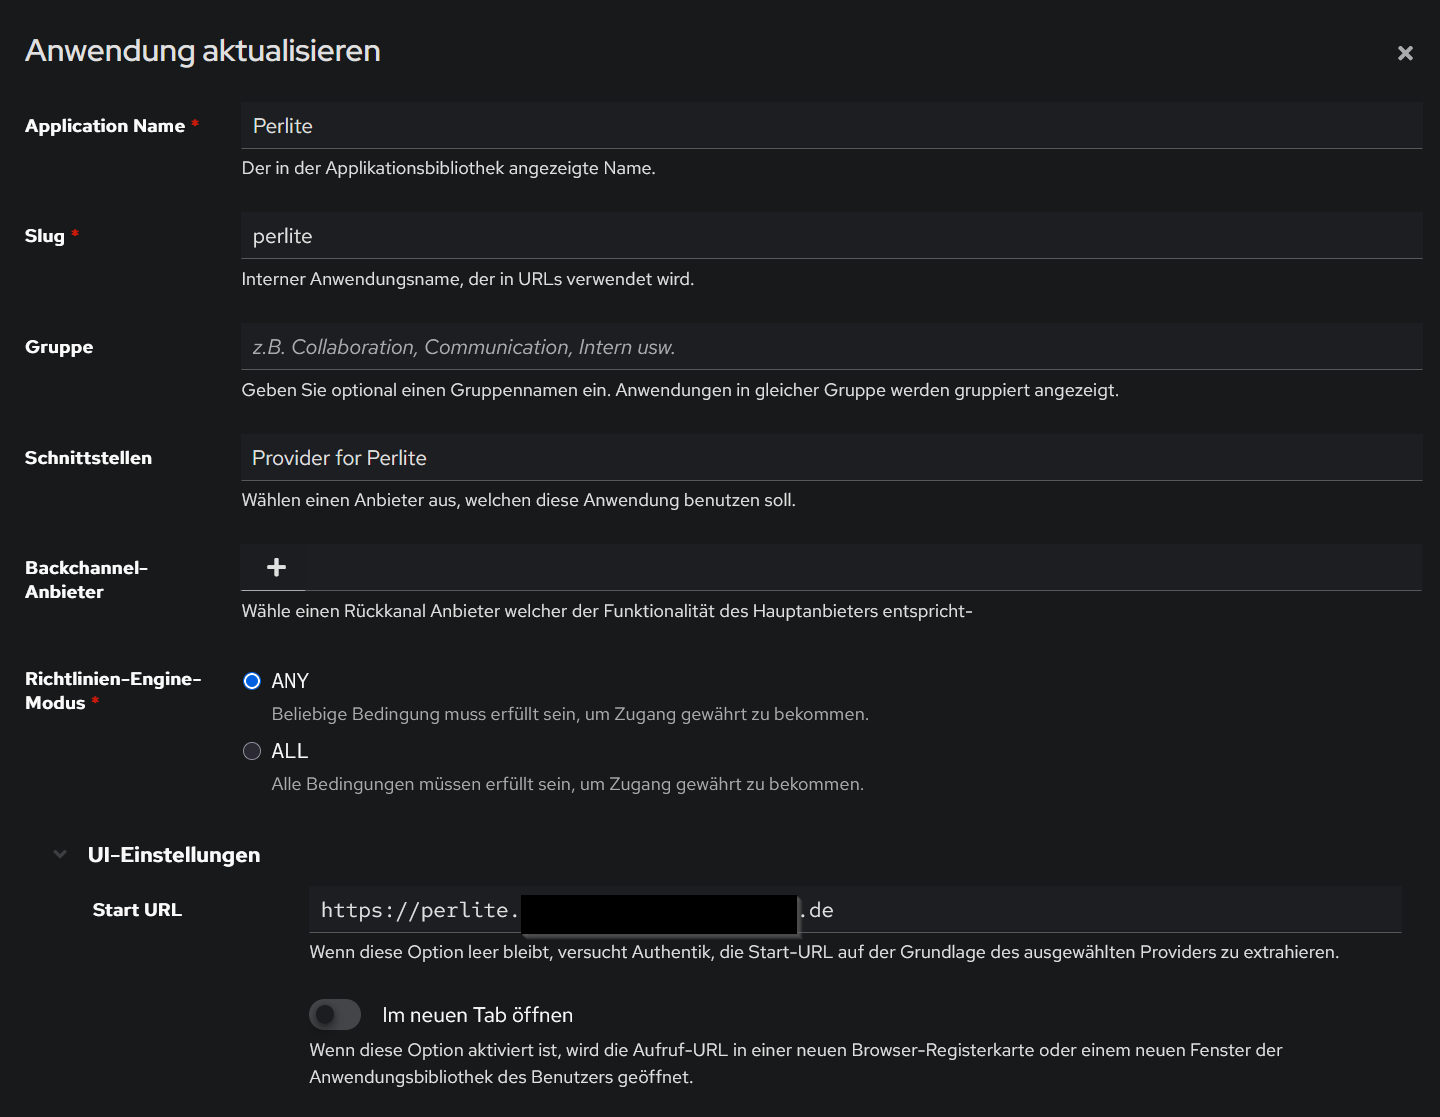
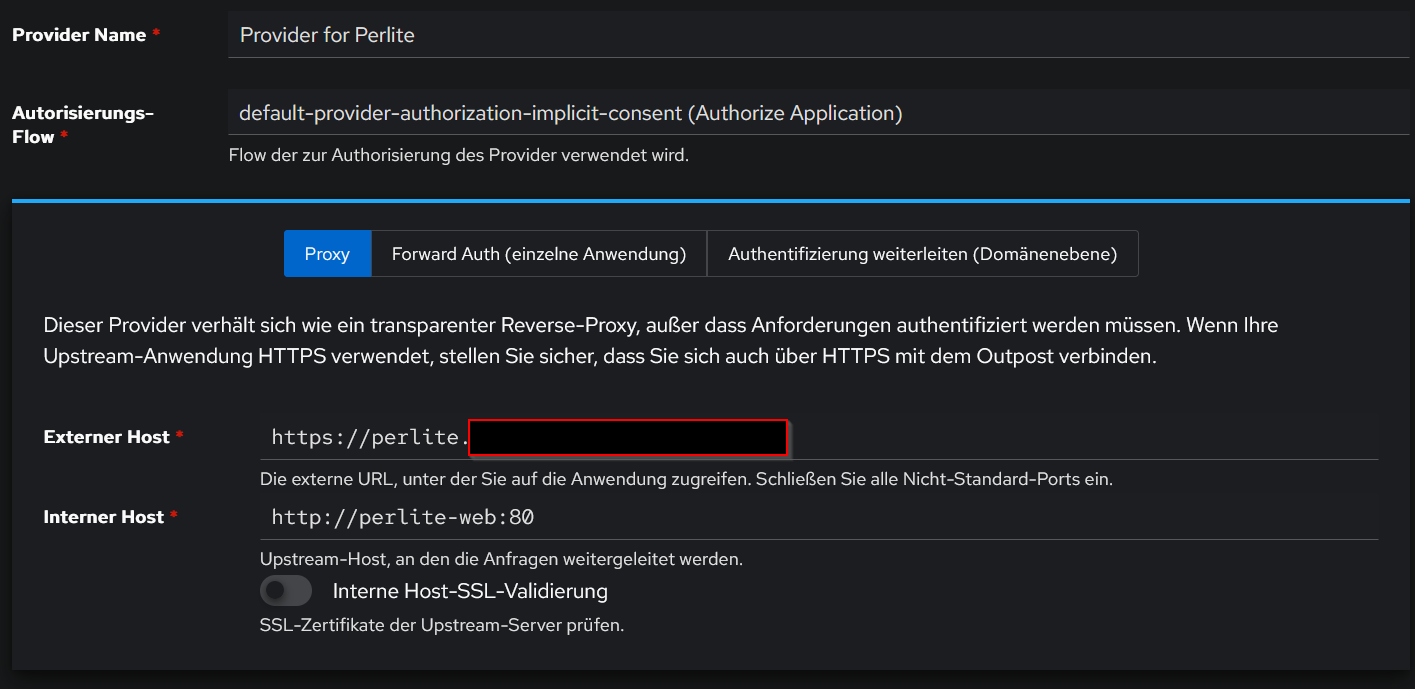
In the provider options we use the default implicit flow and select „Proxy“.
- External Host will be the same URL we used for the Start URL: https://perlite.customer.company.de
- Internal Host is the service name of the Perlite nginx container that we customized: http://perlite-web
- We don’t need any SSL validation, as this is already handled by our nginx reverse proxy
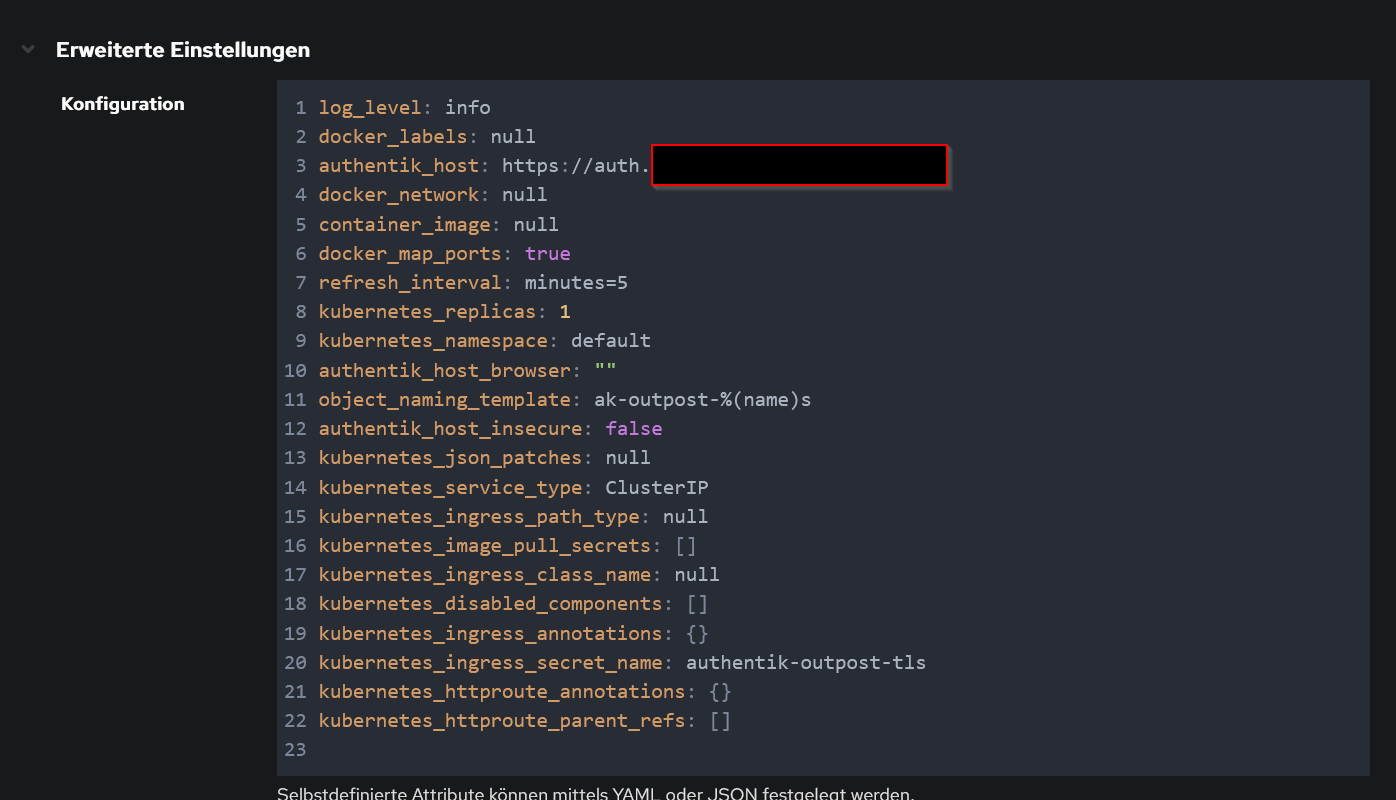
Outpost Configuration
We can use the default authentik Embedded Outpost and only need to assign our app to it and set the correct host in the advanced settings. We will use another subdomain like https://auth.customer.company.de for this.
That’s it, now we should be able to see and access our app in the authentik User Dashboard. The user and app management can be done via the admin panel from authentik.
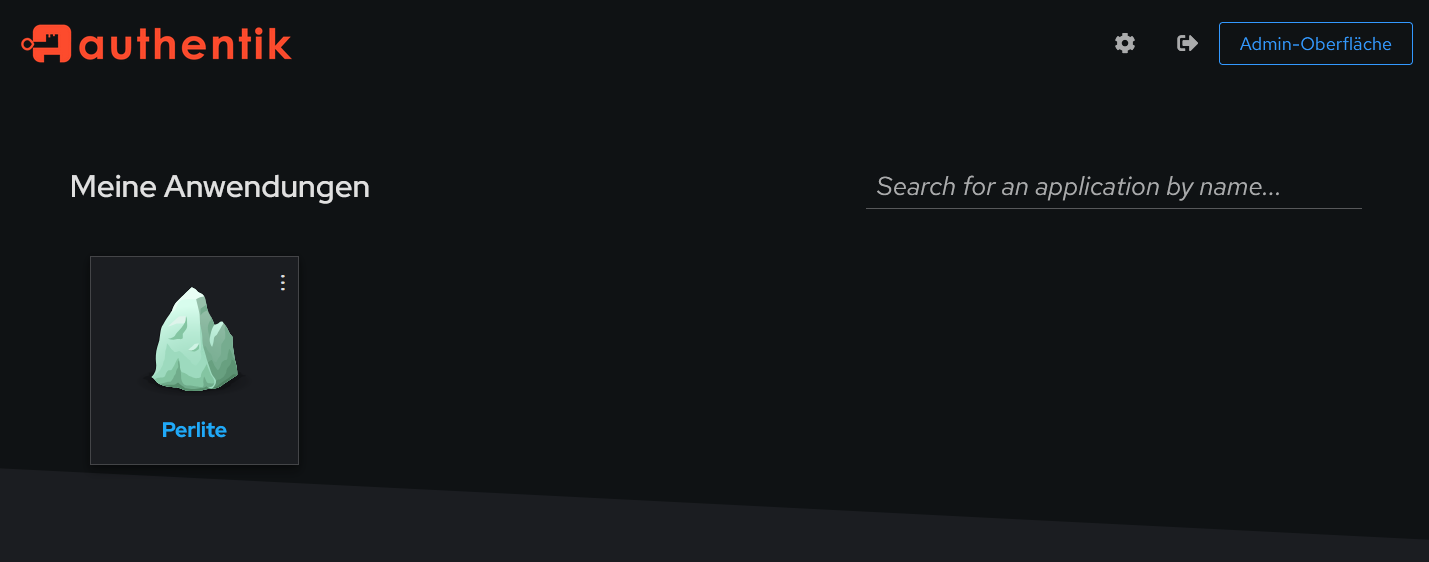
If a users tries to access https://perlite.customer.company.de he will be first forwarded to the authentik authentication page
after login he can access the app as usual.
Multiple Perlite Instances
If you want to deploy multiple Perlite instances (apps), you need to make two additional adjustments to the Perlite configuration.
Since all these instances will run on the same Docker network, we need unique service and container names. Therefore, adjust the Docker Compose file for each instance accordingly (notice perlite2 and perlite-web2).
services:
  perlite2:
    image: sec77/perlite:latest
    container_name: perlite2
    restart: unless-stopped
    environment:
      - NOTES_PATH=Demo
      - HIDE_FOLDERS=docs,private,trash
      - LINE_BREAKS=true
      - ABSOLUTE_PATHS=false
    volumes:
      - ./Demo:/var/www/perlite/Demo:ro
    networks:
      - authentik_default

  perlite-web2:
    image: nginx:stable
    container_name: perlite_web2
    restart: unless-stopped
    volumes:
      - ./web/config/perlite.conf:/etc/nginx/conf.d/default.conf:ro
    volumes_from:
      - perlite2
    depends_on:
      - perlite2
    networks:
      - authentik_default

networks:
  authentik_default:
    external: true
We also need to adjust the nginx config in /web/config/perlite.conf to use the correct Perlite PHP container, change the fastcgi_pass to perlite2:9000.
location ~ \.php$ {
        try_files $uri = 404;
        fastcgi_split_path_info ^(.+\.php)(/.+)$;
        fastcgi_pass perlite2:9000;
        fastcgi_index index.php;
        include fastcgi_params;
        fastcgi_param REQUEST_URI $request_uri;
        fastcgi_param SCRIPT_FILENAME $document_root$fastcgi_script_name;
        fastcgi_param PATH_INFO $fastcgi_path_info;
    }
Repeat the steps for setting up the application in authentik as you did for the first app, but use different external host subdomains and the customized service name for the internal host. (like http://perlite-web2:80)
Document / Folder Based Access Control
I strongly recommend using a separate app (e.g., Perlit/Vault) for each access level. However, there is a way to manage access control for documents/folders via authentik and nginx. We use the authentik groups to match them with predefined restricted path names. This means that we can restrict certain notes (or entire folders) to specific groups.
Before you are begin setup, there are some important caveats:
- The restricted files and corresponding authorized groups can only be defined in the nginx config.
- The restriction is based on regex, which makes it prone to errors.
- You must pay attention to URL encoding and take this into account when creating the rules for regular expressions.
- We can only restrict access to the files themselves; the folders and file names remain visible in the menu.
- You must disable the entire search, otherwise the search will leak parts of the restricted documents.
Authentik Config
First we need to change the Provider type from „Proxy“ to „Forward Auth“. This means that authentik will forward the authentication headers to the backend, as Perlite has no functionality implemented to handle these headers we will configure our nginx reverse proxy to handle this.
Perlite Config
In Perlite we need to use the default docker-compose.yml and expose the web port to localhost, so nginx can access it.
perlite-web:
    image: nginx:stable
    container_name: perlite_web
    restart: unless-stopped
    ports:
      - 127.0.0.1:8080:80
    volumes:
      - ./web/config/perlite.conf:/etc/nginx/conf.d/default.conf:ro
    volumes_from:
      - perlite
    depends_on:
      - perlite
Nginx Config
Here we need to change several things:
- We need a dedicated server block for our app URL, that redirects the user to the outpost and retrieves the necessary authentication headers.
- We need to define the restricted path and allowed groups, this will be handled by mappings.
We can use the predefined config template which is provided by the authentik provider.
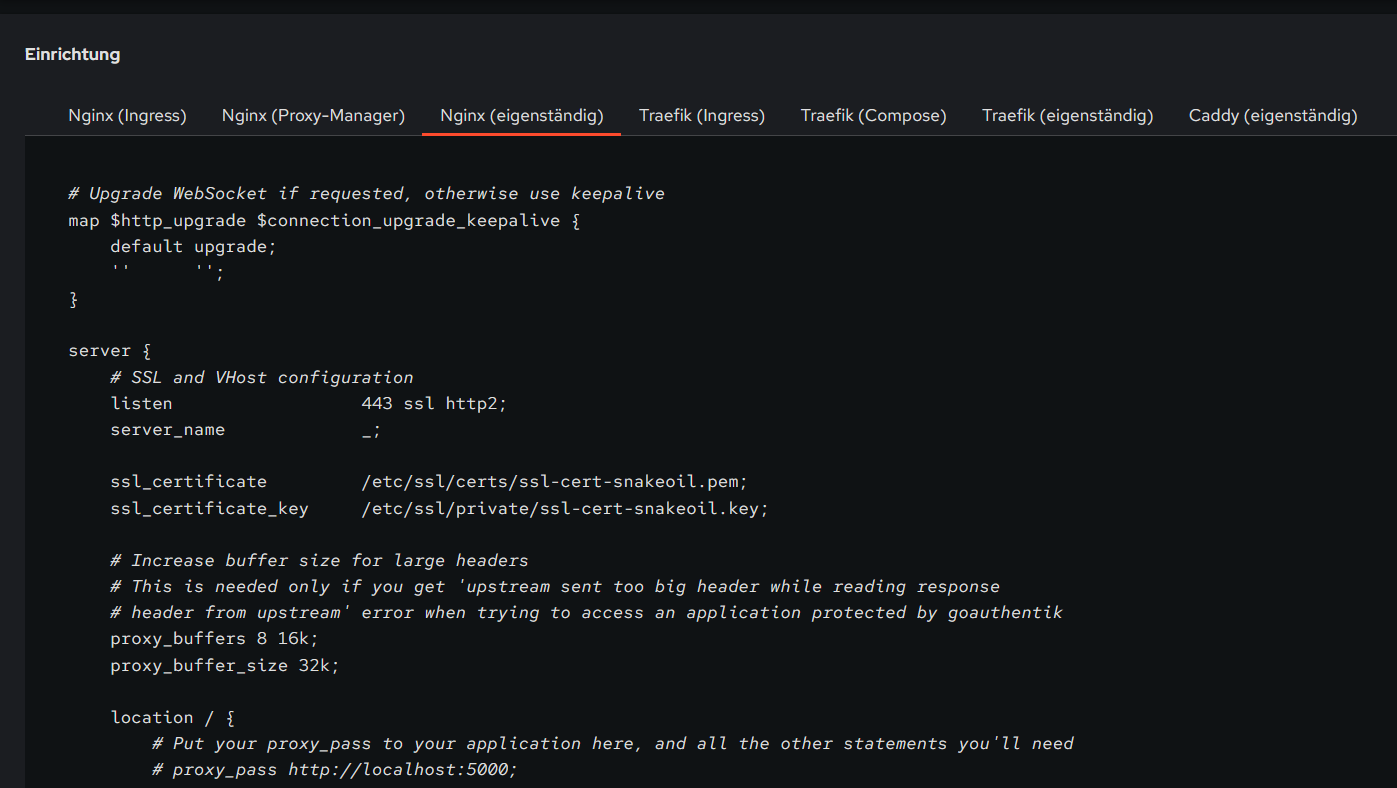
In this template we will add and change a few things.
In the server block, define the app URL:
server_name perlite.customer.company.de;In the server block, add a new location block for the access denied handling:
    # Custom 403 page shown when Authentik denies access
    location @access_denied {
        internal;
        default_type text/html;
        return 200 '<html><head><title>Access Denied</title></head><body><h1>Access Denied</h1><p>You do not have permission to view this document.</p></body></html>';
    }
In the location / block, set the proxy_pass to a variable, link 502 to the access denied handler and prohibit the search:
if ($arg_search) {
    return 502;  # trigger the @access_denied page
}

proxy_pass       http://$perlite_upstream;
error_page       502 = @access_denied;
Outside of the server blocks (top level) we define the mappings.
The first map define the restricted path and which group should have access to it, in this case:
- Demo Documents/Images can be accessed by everyone
- Demo Documents/Priv can only be accessed by perlite-admin
- All other files in Demo Documents can only be accessed by perlite-demo-documents
The second map defines:
- the authentik group perlite-admin matches our defined perlite-admin variable.
- the authentik group perlite-admin also matches the perlite-demo-documents variable.
- the authentik group perlite-demo-documents matches the defined perlite-demo-documents variable.
# Map mdfile path → required Authentik group name
map $arg_mdfile $required_group {
    default                                    "";
    "~*Demo(%20|\+)Documents(\/|%2F)Images"    "";
    "~*Demo(%20|\+)Documents(\/|%2F)Priv"      "perlite-admin";
    "~*Demo(%20|\+)Documents"                  "perlite-demo-documents";
}

# Group membership check — does the user have the required group for this path?
map $authentik_groups:$required_group $user_has_group {
    default                                                0;
    "~*perlite-admin\|?.*:perlite-admin"                   1;
    "~*perlite-admin\|?.*:perlite-demo-documents"          1;
    "~*perlite-demo-documents\|?.*:perlite-demo-documents" 1;
}

# Is this path restricted?
map $required_group $is_restricted {
    default  0;
    "~*.+"   1;
}

# Final upstream decision — denied requests go to a non-existent
# port which triggers 502, caught by error_page → @access_denied
map $is_restricted:$user_has_group $perlite_upstream {
    default  "127.0.0.1:8080";  # allow
    "1:0"    "127.0.0.1:8888";  # deny — nothing listens here
}
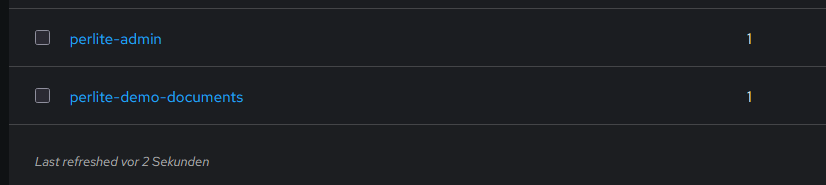
In authentik we create the necessary groups and assign them to users.
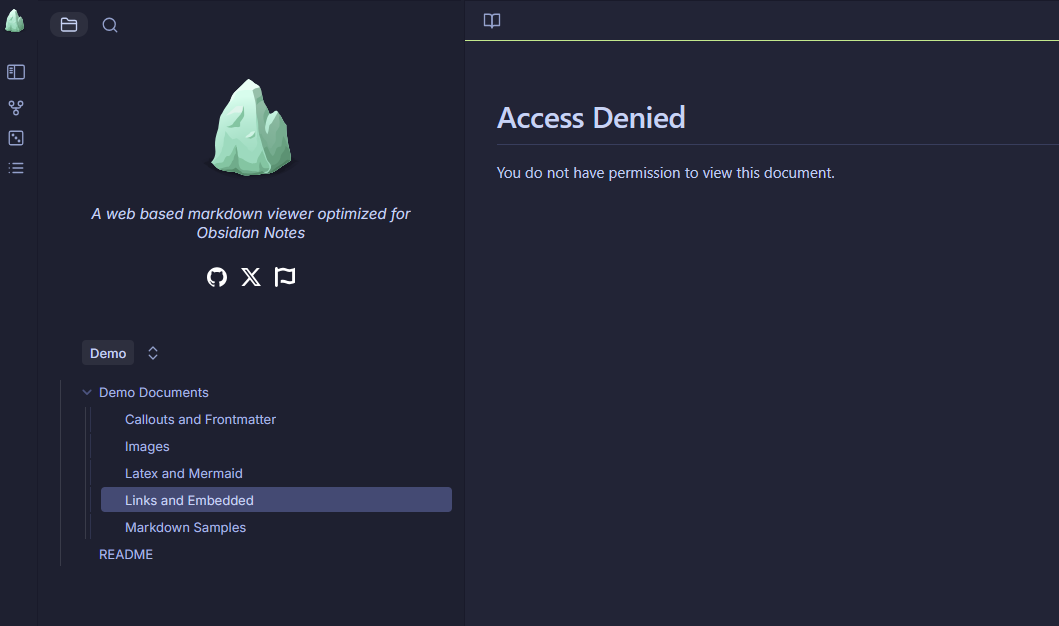
If we are not member of the perlite-admin or perlite-demo-documents group we can only access Images in the Demo Documents folder, for every other file in this folder we will get a access denied.
Here you can find the final NGINX config
# Map mdfile path → required Authentik group name
map $arg_mdfile $required_group {
    default                                    "";
    "~*Demo(%20|\+)Documents(\/|%2F)Images"    "";
    "~*Demo(%20|\+)Documents(\/|%2F)Priv"      "perlite-admin";
    "~*Demo(%20|\+)Documents"                  "perlite-demo-documents";
}

# Group membership check — does the user have the required group for this path?
map $authentik_groups:$required_group $user_has_group {
    default                                                0;
    "~*perlite-admin\|?.*:perlite-admin"                   1;
#    "~*perlite-admin\|?.*:perlite-demo-documents"          1;
    "~*perlite-demo-documents\|?.*:perlite-demo-documents" 1;
}

# Is this path restricted?
map $required_group $is_restricted {
    default  0;
    "~*.+"   1;
}

# Final upstream decision — denied requests go to a non-existent
# port which triggers 502, caught by error_page → @access_denied
map $is_restricted:$user_has_group $perlite_upstream {
    default  "127.0.0.1:8080";  # allow
    "1:0"    "127.0.0.99:8888";  # deny — nothing listens here
}

# Upgrade WebSocket if requested, otherwise use keepalive
map $http_upgrade $connection_upgrade_keepalive {
    default upgrade;
    ''      '';
}


# ============================================================
# HTTP → HTTPS redirect
# ============================================================
server {
    listen 80;
    server_name *.customer.company.de;
    return 301 https://$host$request_uri;
}

# ============================================================
# Authentik UI (wildcard — all subdomains not matched above)
# ============================================================
server {
    listen 443 ssl;
    server_name auth.customer.company.de;

    ssl_certificate     /etc/letsencrypt/live/customer.company.de/fullchain.pem;
    ssl_certificate_key /etc/letsencrypt/live/customer.company.de/privkey.pem;

    location / {
        proxy_pass         http://127.0.0.1:9000;
        proxy_set_header   Host              $host;
        proxy_set_header   X-Real-IP         $remote_addr;
        proxy_set_header   X-Forwarded-For   $proxy_add_x_forwarded_for;
        proxy_set_header   X-Forwarded-Proto $scheme;
        proxy_http_version 1.1;
        proxy_set_header   Upgrade           $http_upgrade;
        proxy_set_header   Connection        "upgrade";
        proxy_buffering    off;
        proxy_read_timeout 600s;
    }
}

# ============================================================
# Perlite — forward auth with per-path group restriction
# ============================================================
server {
    listen 443 ssl;
    server_name perlite.customer.company.de;

    ssl_certificate     /etc/letsencrypt/live/customer.company.de/fullchain.pem;
    ssl_certificate_key /etc/letsencrypt/live/customer.company.de/privkey.pem;

    proxy_buffers     8 16k;
    proxy_buffer_size 32k;

    # ----------------------------------------------------------
    # Authentik outpost passthrough — login flow & callbacks
    # ----------------------------------------------------------
    location /outpost.goauthentik.io {
        # When using the embedded outpost, use:
        proxy_pass              http://127.0.0.1:9000/outpost.goauthentik.io;
        # For manual outpost deployments:
        # proxy_pass              http://outpost.company:9000;

        # Note: ensure the Host header matches your external authentik URL:
        proxy_set_header        Host $host;

        proxy_set_header        X-Original-URL $scheme://$http_host$request_uri;
        add_header              Set-Cookie $auth_cookie;
        auth_request_set        $auth_cookie $upstream_http_set_cookie;
        proxy_pass_request_body off;
        proxy_set_header        Content-Length "";
    }

    # Special location for when the /auth endpoint returns a 401,
    # redirect to the /start URL which initiates SSO
    location @goauthentik_proxy_signin {
        internal;
        add_header Set-Cookie $auth_cookie;
        return 302 /outpost.goauthentik.io/start?rd=$scheme://$http_host$request_uri;
        # For domain level, use the below error_page to redirect to your authentik server with the full redirect path
        # return 302 https://authentik.company/outpost.goauthentik.io/start?rd=$scheme://$http_host$request_uri;
    }

    # Custom 403 page shown when Authentik denies access
    location @access_denied {
        internal;
        default_type text/html;
        return 200 '<html><head><title>Access Denied</title></head><body><h1>Access Denied</h1><p>You do not have permission to view this document.</p></body></html>';
    }


    location / {
        # Put your proxy_pass to your application here, and all the other statements you'll need
        # proxy_pass http://localhost:5000;
        # proxy_set_header Host $host;
        # proxy_set_header ...
        # Support for websocket

        if ($arg_search) {
            return 502;  # trigger the @access_denied page for testing
        }


        #proxy_pass http://127.0.0.1:8080;
        proxy_pass       http://$perlite_upstream;

        proxy_set_header Upgrade $http_upgrade;
        proxy_set_header Connection $connection_upgrade_keepalive;


        ## Debug headers to verify correct behavior of the access control logic — these can be removed once everything is working
        # add_header X-Debug-arg-mdfile    $arg_mdfile    always;
        # add_header X-Debug-authentik-groups $authentik_groups always;
        # add_header X-Debug-is-restricted  $is_restricted  always;
        # add_header X-Debug-user-has-group $user_has_group always;
        # add_header X-Debug-required-group   $required_group   always;


        ##############################
        # authentik-specific config
        ##############################
        auth_request     /outpost.goauthentik.io/auth/nginx;
        error_page       401 = @goauthentik_proxy_signin;

        error_page       502 = @access_denied;

        auth_request_set $auth_cookie $upstream_http_set_cookie;
        add_header       Set-Cookie $auth_cookie;

        # translate headers from the outposts back to the actual upstream
        auth_request_set $authentik_username $upstream_http_x_authentik_username;
        auth_request_set $authentik_groups $upstream_http_x_authentik_groups;
        auth_request_set $authentik_entitlements $upstream_http_x_authentik_entitlements;
        auth_request_set $authentik_email $upstream_http_x_authentik_email;
        auth_request_set $authentik_name $upstream_http_x_authentik_name;
        auth_request_set $authentik_uid $upstream_http_x_authentik_uid;

        proxy_set_header X-authentik-username $authentik_username;
        proxy_set_header X-authentik-groups $authentik_groups;
        proxy_set_header X-authentik-entitlements $authentik_entitlements;
        proxy_set_header X-authentik-email $authentik_email;
        proxy_set_header X-authentik-name $authentik_name;
        proxy_set_header X-authentik-uid $authentik_uid;

        # This section should be uncommented when the "Send HTTP Basic authentication" option
        # is enabled in the proxy provider
        # auth_request_set $authentik_auth $upstream_http_authorization;
        # proxy_set_header Authorization $authentik_auth;
    }

}